Sending e-mail
The e-mail feature of Bobuild is great for sending workflow notifications or reminders.
Single e-mail messages can be sent when a form is submitted, thus upon creation of modification of an existing record. For instance, you can use this feature to send a confirmation via e-mail when someone creates an account or inputs data in your app. Another possibility is to create a form without fields but just the submit button: in that case, no data will be altered but you'll be able to trigger an e-mail message manually.
If you want to send multiple messages at the same time, there are two options:
- you can enable checkboxes on a grid view: this allows your users to select one or more records and then send an e-mail for all of them;
- you can create a batch task from the builder, which means defining a set of criteria to select records and triggering the e-mail task manually: use this to send e-mails to all the users who meet certain criteria.
Use cases
You might want to send an e-mail in the following circumstances:
- whenever an user submits an order, you send both a receipt to them and a notification to your employees;
- whenever you ship an order, you send a notification to the user;
- after you close a Call for Papers, you send a "Thank you" e-mail to all applicants;
- after you apply evaluation to all the application, you send an acceptance notification to all applications with more than four stars and a rejection notification to the others;
- the week before your event, you send a reminder to all the attendees who didn't enter their car plates in your portal built with Bobuild.
Configuring an e-mail task
Regardless of whether you are creating a form submit task, a grid checkboxes task or an object task, the configuration of an e-mail task is the same:
Conditional sending (defining when the e-mail is sent or not)
Like any task, an e-mail task can have a set of conditions to determine when it will be triggered or not. For instance, you can send an e-mail only when a certain field is set to a certain value, or when a date is in the past.
In the case of a form submit, the conditions are evaluated against the record that is being created or updated. In the case of a grid checkboxes task or a manual task, the conditions are evaluated against each record that is selected by the user or that meets the criteria.
You can use this conditional logic to send different e-mails when needed. For instance, suppose you want to send an e-mail in English to some users and in Spanish to other users based on a "Language" field in the user object: just create two tasks with conditions on the Language field.
Recipients
Usually there are two ways you want to use an e-mail task:
- to send a message to your team, for instance to notify them that a new order has been placed;
- to send a message to the user who submitted the form, for instance to send a confirmation e-mail.
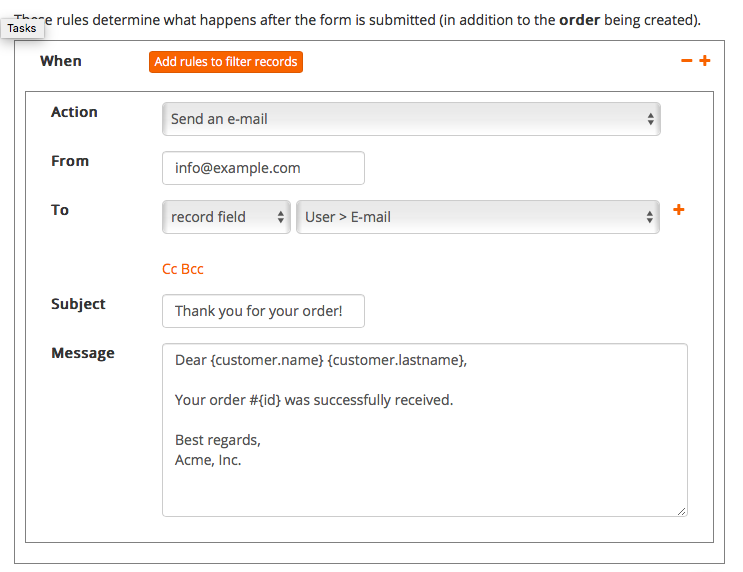
In the first case you'll want to set the recipient to a fixed address configured in the e-mail task configuration. In the second case, you'll want to set the recipient to a value taken from the record itself, for instance the e-mail address of the user who submitted the form. In the screenshot above, we are using an object field as recipient e-mail.
Customizing the message body
In order to add dynamic data to the subject and/or the body of your message, you can simply embed values taken from the record itself. The syntax for this is simple: just write {FIELD_NAME} where needed, where FIELD_NAME is the field you want to embed. For example, {name}, {lastname} are valid field names.
Example:
Dear {name} {lastname},
thank you for creating an account on our platform.
Best regards
Note that field names must belong to the current object, i.e. the object that your form is creating/updating. In the screenshot above, the form is creating a new order record, thus the message body contains a {id} placeholder that embeds the ID of the newly created order.
In order to access linked objects' fields, you can use the dot-syntax to go up the chain. For example, suppose that your order object has a reference field called "customer" that links a customer object. In this case we'd use the syntax {customer.name} to reference the name field of the record referenced by the current record's customer field:
Dear {customer.name} {customer.lastname},
thank you for your order. The total amount is {total} and the order ID is {id}.
Best regards
With a more advanced syntax you can also apply transformations to field values when embedding them in your e-mail (see the placeholder functions page).
Outgoing E-mail
Delivery is configured once for the whole app under Outgoing E-mail in the Builder sidebar. Getting this right protects deliverability (messages reach inboxes instead of spam), keeps brand-specific senders on the right infrastructure, and lets staging apps send mail safely without surprising real customers.
Typical scenarios:
- invoices leave from
billing@your-company.comvia corporate Office 365, while automated alerts use a different noreply address on another SMTP server; - a staging clone must never email real users — you intercept every message to a single test inbox;
- you temporarily disable outgoing mail while you rework templates or after restoring a snapshot.
Delivery mode
| Mode | Behaviour |
|---|---|
| Enabled | Mail is sent normally to the configured recipients |
| Enabled, but route all mail to a specific address | Every message is redirected to one intercept address (ideal for staging / UAT) |
| Disabled | Nothing is sent (also the default after restoring a snapshot) |
Internal SMTP server
By default, Bobuild can deliver low-traffic transactional mail through its internal SMTP server. The default sender looks like no-reply@yourapp.bobuild.com. You can whitelist additional sender addresses for the internal server when needed.
For production volume and maximum deliverability, configure your own external SMTP servers instead.
If you want to keep using the internal server with a custom domain address, update the domain SPF record to include include:spf.bobuild.com, then contact us to enable that sender.
External SMTP servers (multiple senders)
You can add several external SMTP servers and map sender addresses to each one. When a task sends mail from a given From address, Bobuild routes it through the server that lists that sender.
For each server you configure:
- an optional label
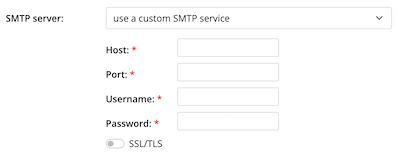
- Host and Port, or Office365 OAuth (Tenant ID, Client ID, Client secret)
- Username / Password (leave password blank when editing to keep the existing secret)
- SSL/TLS when not using Office 365 OAuth
- one or more Sender addresses (at least one is required)
Rules of thumb:
- each sender address belongs to one SMTP server only;
- the From address used in your e-mail tasks must match a configured sender, otherwise deliverability suffers and providers may treat the message as spam;
- external SMTP is the most reliable production setup — simpler than SPF workarounds and under your organisation's mail reputation.
Using a Gmail address
To send from Gmail, add Gmail's SMTP server as an external server. The password is not your normal Gmail password: create an app password in your Google account settings.
Delivery logs
On the same Outgoing E-mail page, expand Pending messages and Recently sent to inspect the mail queue:
- Pending messages — e-mails waiting to be sent. Each row shows From, To/Cc/Bcc, subject, and the last error when delivery failed. Use Remove from queue to drop a message that should not be sent.
- Recently sent — the last 10 successfully delivered messages, with queue time and the SMTP server reply.
Use these panels when a task reports success but mail never arrives, or when you need to confirm delivery after changing SMTP settings.
Attachments
E-mail tasks can attach files from File and Image fields.
In the e-mail task configuration, open Attachments:
- From this record — pick one or more file/image fields on the object the task runs on (for example the invoice PDF on the order being submitted). Use Add from this record when the section is hidden.
- From other records — click Add from other records, choose an object type, set a Filter, and pick a File field. Every matching record contributes its file (for example all line-item documents linked to the current order).
When several sources resolve to the same filename, Bobuild renames duplicates (report.pdf, report (2).pdf, …). Empty or missing files are skipped.
Typical uses:
- send a generated document stored on the record;
- attach a signed contract from a file field;
- bundle PDFs from related rows in one notification.
Attachments respect Outgoing E-mail delivery mode (including intercept routing for staging).
Formatting e-mail body
In order to add formatting to your e-mail body just use Markdown syntax. For instance:
Hello!

This text is in **bold** and this one is in *italic*.

* This is a bullet point
* And also this one
See this page about the Markdown syntax to learn more.