User login
Bobuild lets you protect your app, or parts of it, with user logins. The mechanism is very flexible and can be adapted to any need. For how login fits with Builder access, portals, and the API, see the Security overview.
The basic idea is that users are just normal records of an object that you decide to use for authentication.
Several authentication methods are available:
- E-mail + password
- E-mail + magic link sent via e-mail
- Login with Google
- Login with Microsoft/Office365
- Login with SPID
- Login with CIE (Italian Electronic Identity Card)
Login can be enabled for each top-level page (we also call them portals), which means that you can have different authentication methods for different parts of your app.
In this example, the app contains three portals:
- a backoffice portal, which is protected by a login based on the operator object
- a customer portal, which is protected by a login based on the customer object and also allows self-service registration
- a public section, which is not protected by any login
- How to configure it in the builder
- How it looks like in the resulting app


How to set up login
Open the top-level page you want to protect. You'll notice a "Public" badge in the top bar, which means that the page and its sub-pages are currently not protected by any login:
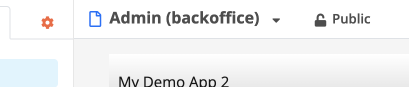
Clicking on it will bring you to the login settings:
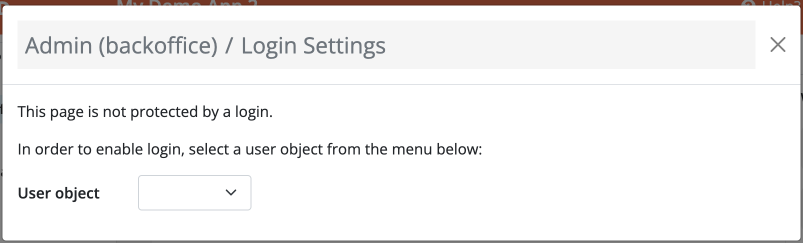
Here you can choose any object to use for user authentication. If that object has a unique e-mail field and a password field, e-mail + password login is enabled automatically; otherwise configure another method (magic link or SSO) on the login widget.
Setting roles and authorizations
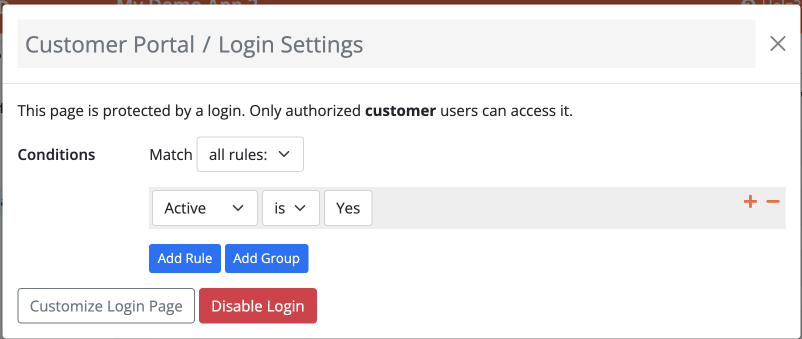
The login mechanism is very flexible and allows you to restrict which users can access which pages. For instance, you might only allow customers to access your portal if they are marked as "active", or you might want to allow only certain employees to access a specific area of your backoffice.
In order to do this, you can set rules like this:
Another way to use rules is to create a "roles" field in your user object, whose type is "Multiple Choice". This way you can attach multiple tags to each user representing their authorizations, and use them in the login rules like this:
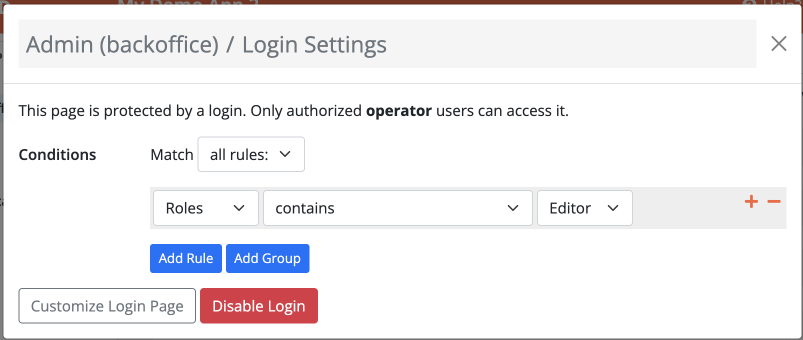
These rules are checked at login as well as when browsing the portal: if the user does not match the filter on the root (login-protected) page, authentication fails and no session is created — the same access denied message can be shown.
Session timeout
In the login widget options, open Session timeout and set Idle timeout:
- 15 minutes, 30 minutes, 1 hour, 8 hours, 24 hours (default), or 7 days
- Forever — the session does not expire from idle time
The timer resets when the user is active in the app. After the idle period, the session is closed and they must sign in again.
Self-service registration and password reset
If you want to let your users create their account, you can enable self-service registration. This will add a "Register" button to the login page, linked to a specific sub-page that you can freely customize adding a form widget that collects user's data and creates a new record in the user object.
Here are some good ideas to consider when enabling self-service registration:
- Consider sending an e-mail confirmation to the user after registration. This is easily done by configuring a "Send e-mail" task in the registration form.
- Consider enabling password reset using the built-in functionality, so that users can recover their password if they forget it.
- If you want to review and approve new users before they can access the app, create a boolean field named "Active" in your user object (or, alternatively, in case you want to handle multiple statuses, a choice field named "User Status"), and leave it to a default value when users register. Then, in your backoffice portal, create a grid widget to list all users needing approval. Then, configure the login rules to allow access only to users with "Active" set to true as described above.
- How to configure it in the builder
- How it looks like in the resulting app

Redirecting users after login
In the "Follow-up" section of the login widget configuration you can define rules in order to redirect users to another page after login. For instance, you might want to check if the user accepted your Terms of Service or updated their details and point them to the relevant pages instead of having them redirected to the main page.
If a user who is already logged in opens the login page, Bobuild skips the form and applies the same follow-up redirect (or sends them to the parent portal page).
Access denied message
In the login widget options, set Access denied message to customize the text shown when authentication fails — wrong e-mail or password, unknown user with SSO, and similar cases. Leave it blank to show no message.
Login methods
E-mail + password
This is the most classic authentication method. In order to enable this, you need to make sure your user object has an e-mail and a password field. Make sure the e-mail field is marked as unique alone.
Magic link
With this authentication method, users will be presented with a single input box asking for their e-mail address. If the provided address is present in the object you chose as the user object, a message will be sent via e-mail to the entered e-mail address containing a short-lived link. By clicking on such link, user will be automatically logged into your reserved area.
This method is convenient in many situations, and it is not less secure than using an e-mail/password combination: in fact, it relies on the fact that only the legitimate user can access their mailbox.
On the login widget, under magic link options you can configure:
- From — which allowed sender address the message uses (from Outgoing E-mail); defaults to the app’s default From
- Link validity — how long the emailed link stays usable (from 10 minutes to 1 week)
- Message subject and body — customise the e-mail text (placeholders supported where available)
Google
A very convenient way to authenticate your users is to use the Login with Google button. This allows users to log in to your app using their Google account, without having to remember yet another password. This is not only convenient for external users, but also for your internal users as you'll rely on Google credentials security, including Two-Factor Authentication.
In order to configure the Google login, you'll need to tell Bobuild how the Google user data relates to your user object fields. This is needed for multiple reasons:
- to find the user in your app if already present (Google user ID and/or e-mail address will be used as search criteria)
- to create a new user if not present yet (Google user ID, e-mail address and name will be used to populate the new record)
It is usually enough to map the e-mail field, which will identify the user uniquely. Google user ID and name are optional; if you don't map them, they will be ignored.
- How to configure it in the builder
- How it looks like in the resulting app


Microsoft/Office365
Similarly to Google, users can sign in with their Microsoft / Office 365 account. Map at least the e-mail field so Bobuild can match the Microsoft identity to a record in your user object.
App-level SSO settings live under Settings → Single Sign-On → Microsoft:
- Use default Bobuild integration — quickest setup when the default app registration is enough
- Use custom credentials — supply Tenant ID, Client ID, and Client secret from your own Azure app registration
Use a specific Tenant ID when only accounts from your organisation should sign in (single-tenant). Broader / multi-tenant setups use the tenant configuration appropriate to your Azure app (for example the common endpoint). Restricting the tenant is a simple way to harden an internal portal without maintaining a separate password directory.
You can also override credentials on a specific login page when needed.
SPID/CIE
Bobuild supports Italian public digital identities (SPID and CIE). Configure the federation once under Settings → Single Sign-On → SPID/CIE, then enable the methods on each portal’s login options.
Typical scenarios:
- a public-sector portal that must accept SPID for citizens;
- CIE login for users who prefer the Electronic Identity Card;
- raising the required SPID level for sensitive operations.
App settings (SPID/CIE)
- Enable SPID/CIE (plan feature)
- Entity ID (required)
- Private key and Certificate (paste your material; leave the key blank when editing to keep the existing secret — it is never shown again)
- Attribute consuming service index
- Enable validator for testing against the SPID demo validator
- Download SP metadata from the URL shown in the Builder and register it with your identity aggregator as required
Login page options
On the portal login configuration, enable Log-in with SPID and/or Log-in with CIE, map identity attributes to your user object fields (for example fiscalNumber), and choose whether unknown users are created or denied. You can also update mapped fields on every login.
SPID level (1 / 2 / 3) sets the authentication strength required — pick the level your procedure demands so low-assurance logins cannot reach high-sensitivity areas.
SPID/CIE setup involves certificates and metadata exchange. If you need help enabling the plan feature or validating metadata, contact us.
Other login mechanisms
If you have other needs, please contact us as we have a development roadmap that may fit your needs.