Sending e-mail
The e-mail feature of Bobuild is great for sending workflow notifications or reminders.
Single e-mail messages can be sent when a form is submitted, thus upon creation of modification of an existing record. For instance, you can use this feature to send a confirmation via e-mail when someone creates an account or inputs data in your app. Another possibility is to create a form without fields but just the submit button: in that case, no data will be altered but you'll be able to trigger an e-mail message manually.
If you want to send multiple messages at the same time, there are two options:
- you can enable checkboxes on a grid view: this allows your users to select one or more records and then send an e-mail for all of them;
- you can create a manual task from the builder, which means defining a set of criteria to select records and triggering the e-mail task manually: use this to send e-mails to all the users who meet certain criteria.
Use cases
You might want to send an e-mail in the following circumstances:
- whenever an user submits an order, you send both a receipt to them and a notification to your employees;
- whenever you ship an order, you send a notification to the user;
- after you close a Call for Papers, you send a "Thank you" e-mail to all applicants;
- after you apply evaluation to all the application, you send an acceptance notification to all applications with more than four stars and a rejection notification to the others;
- the week before your event, you send a reminder to all the attendees who didn't enter their car plates in your portal built with Bobuild.
Configuring an e-mail task
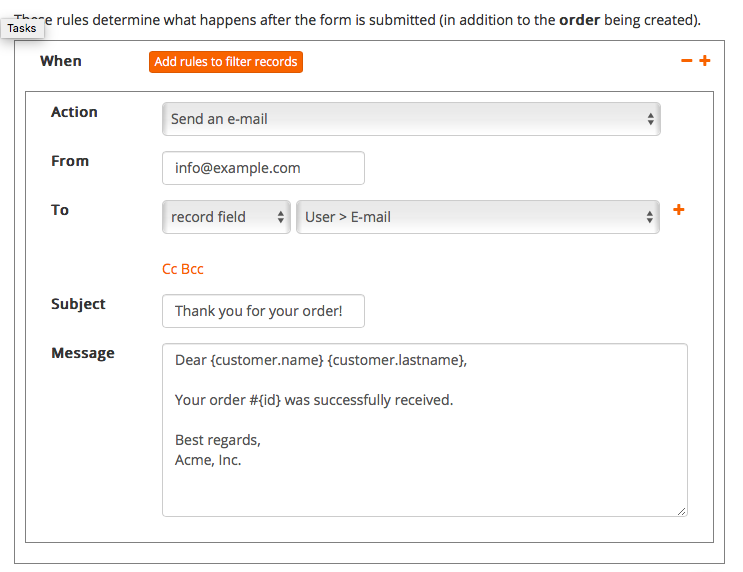
Regardless of whether you are creating a form submit task, a grid checkboxes task or an object task, the configuration of an e-mail task is the same:
Conditional sending (defining when the e-mail is sent or not)
Like any task, an e-mail task can have a set of conditions to determine when it will be triggered or not. For instance, you can send an e-mail only when a certain field is set to a certain value, or when a date is in the past.
In the case of a form submit, the conditions are evaluated against the record that is being created or updated. In the case of a grid checkboxes task or a manual task, the conditions are evaluated against each record that is selected by the user or that meets the criteria.
You can use this conditional logic to send different e-mails when needed. For instance, suppose you want to send an e-mail in English to some users and in Spanish to other users based on a "Language" field in the user object: just create two tasks with conditions on the Language field.
Recipients
Usually there are two ways you want to use an e-mail task:
- to send a message to your team, for instance to notify them that a new order has been placed;
- to send a message to the user who submitted the form, for instance to send a confirmation e-mail.
In the first case you'll want to set the recipient to a fixed address configured in the e-mail task configuration. In the second case, you'll want to set the recipient to a value taken from the record itself, for instance the e-mail address of the user who submitted the form. In the screenshot above, we are using an object field as recipient e-mail.
Customizing the message body
In order to add dynamic data to the subject and/or the body of your message, you can simply embed values taken from the record itself. The syntax for this is simple: just write {FIELD_NAME} where needed, where FIELD_NAME is the field you want to embed. For example, {name}, {lastname} are valid field names.
Example:
Dear {name} {lastname},
thank you for creating an account on our platform.
Best regards
Note that field names must belong to the current object, i.e. the object that your form is creating/updating. In the screenshot above, the form is creating a new order record, thus the message body contains a {id} placeholder that embeds the ID of the newly created order.
In order to access linked objects' fields, you can use the dot-syntax to go up the chain. For example, suppose that your order object has a reference field called "customer" that links a customer object. In this case we'd use the syntax {customer.name} to reference the name field of the record referenced by the current record's customer field:
Dear {customer.name} {customer.lastname},
thank you for your order. The total amount is {total} and the order ID is {id}.
Best regards
With a more advanced syntax you can also apply transformations to field values when embedding them in your e-mail (see the placeholder functions page).
Customizing the sender
By default, e-mail is sent from an address that looks like no-reply@yourapp.bobuild.com.
To customize this address, you need to configure Bobuild with your own SMTP server. You can do so in the app settings:
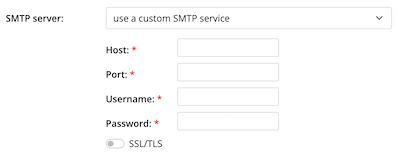
Make sure you use the e-mail address associated to the SMTP server you're using, otherwise your e-mail will have low deliverability and most likely will be marked as spam by most e-mail providers.
Using a Gmail address
If you want to use a Gmail address as sender, you need to configure Bobuild to use Gmail's SMTP server. Note that Gmail's SMTP password is not your Gmail password, but a special password called "app password" that you can generate in your Google account settings. See this page for more information.
I don't have an SMTP server
If you don't have access an a SMTP server and you want to use the internal Bobuild mail server, you can still do so if you have access to the DNS zone of your domain. You'll need to modify the SPF record of the domain to allow Bobuild to send e-mails on your behalf. For this, it is sufficient to add the include:spf.bobuild.com string to your SPF record. For instance, if your e-mail sender will be "info@my-company.com" you'll need to update the SPF record for my-company.com. After doing that, you'll need to contact us to enable the custom e-mail address.
Note that using your own SMTP server as described above is the most reliable way to send e-mails, as it is simpler to configure, it's more reliable and doesn't require any DNS change.
Sending attachments
At the moment, attaching files to e-mail generated with Bobuild is not supported.
Formatting e-mail body
In order to add formatting to your e-mail body just use Markdown syntax. For instance:
Hello!

This text is in **bold** and this one is in *italic*.

* This is a bullet point
* And also this one
See this page about the Markdown syntax to learn more.